This is the configured local template for radios in and around Northeast Ohio. It includes many standard 6m repeater pairs, with the ability to utilize those pairs in additional areas using the user programmable PL tone option.
6m Programming 01272014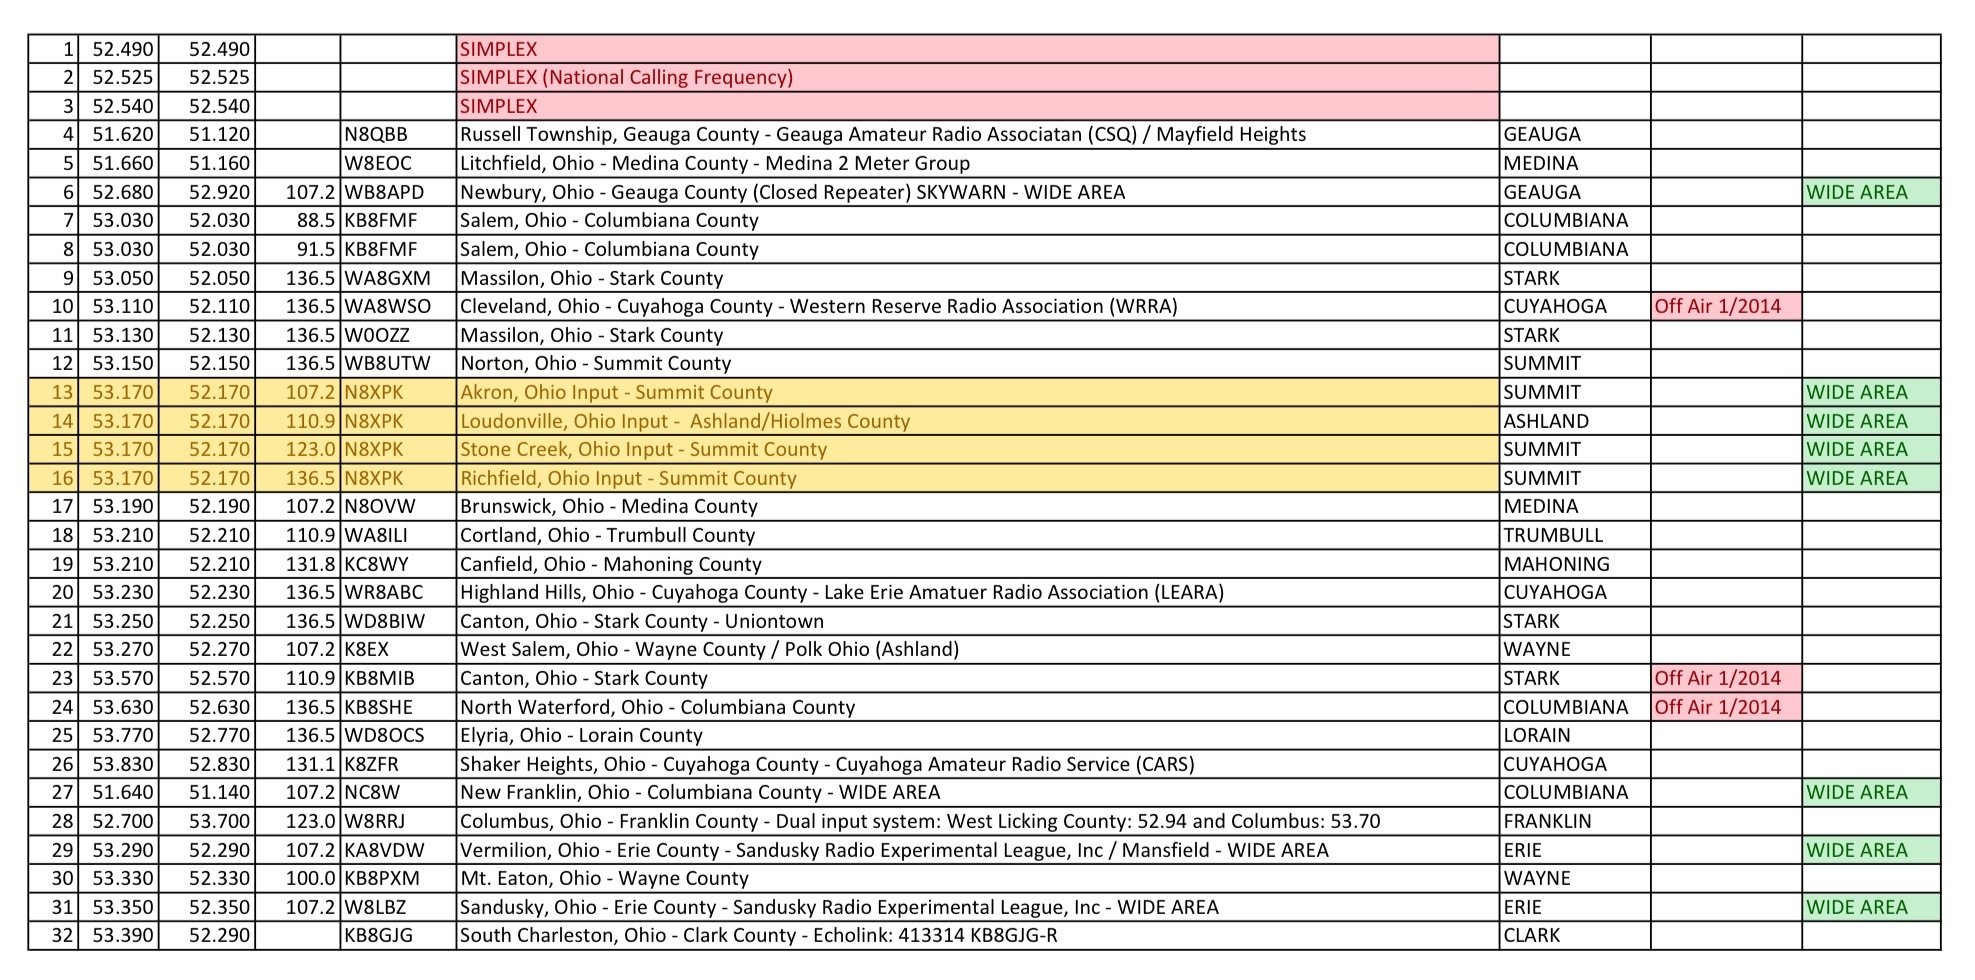 How to read the programming chart:
The table is listed as Channel #, Receive Frequency, Transmit Frequency and standard programmed PL TONE for the frequency. The next column lists the LOCAL Northeast Ohio repeater owner’s CALL and the general location of the repeater. The County is given for more general area. If a repeater is listed as WIDE AREA, it is generally considered to cover a greater area then single site repeater.
You will notice that some channels are listed more than once. It means that these frequencies are programmed with additional characteristics, particularly a different programmed PL tone. This will often allow the operator to utilize a closer input receiver into the repeater.
The RED colored frequencies are SIMPLEX, meaning the TRANSMIT and RECEIVE frequencies are the same. (RADIO to RADIO, both on the same frequency.) CH#2 is programmed to the NATIONAL CALLING frequency. This is a good place to talk DX (distant) when the band conditions are up! CH#1 and CH#3 are frequencies that can be used by operators to chat or talk on if a repeater is not needed.
NOTE: CH #6 is a CLOSED repeater that is used only for EMERGENCY and SKYWARN conditions during bad weather. If you use this machine, you most likely will be asked to leave.
The YELLOW coded frequencies are those of a very high profile repeater system owned by Marty Baker, N8XPK. Marty is a friend and coworker. His machine covers Northeast Ohio VERY well. Simply choose channel listed next to the closest area to where you are transmitting from.
The template is a work in progress, and if you have any suggestions, information on other repeaters, please feel free to comment below.
KCH-3 Basic Control Head Button Assignments
In addition to programming the channels with receive, transmit and PL tones, the TK-630 allows you to program and assign the programmable buttons on the front of the control head for various features and functions. In a commercial environment, a police car might want to turn on sirens and lights with them. A fire engine might want to have the ability to use an outside speaker, or use the radio as a PA system. (The radio does both.)
In our simple Northeast Ohio template, I have programmed the radio to utilize the buttons with these features and functions:
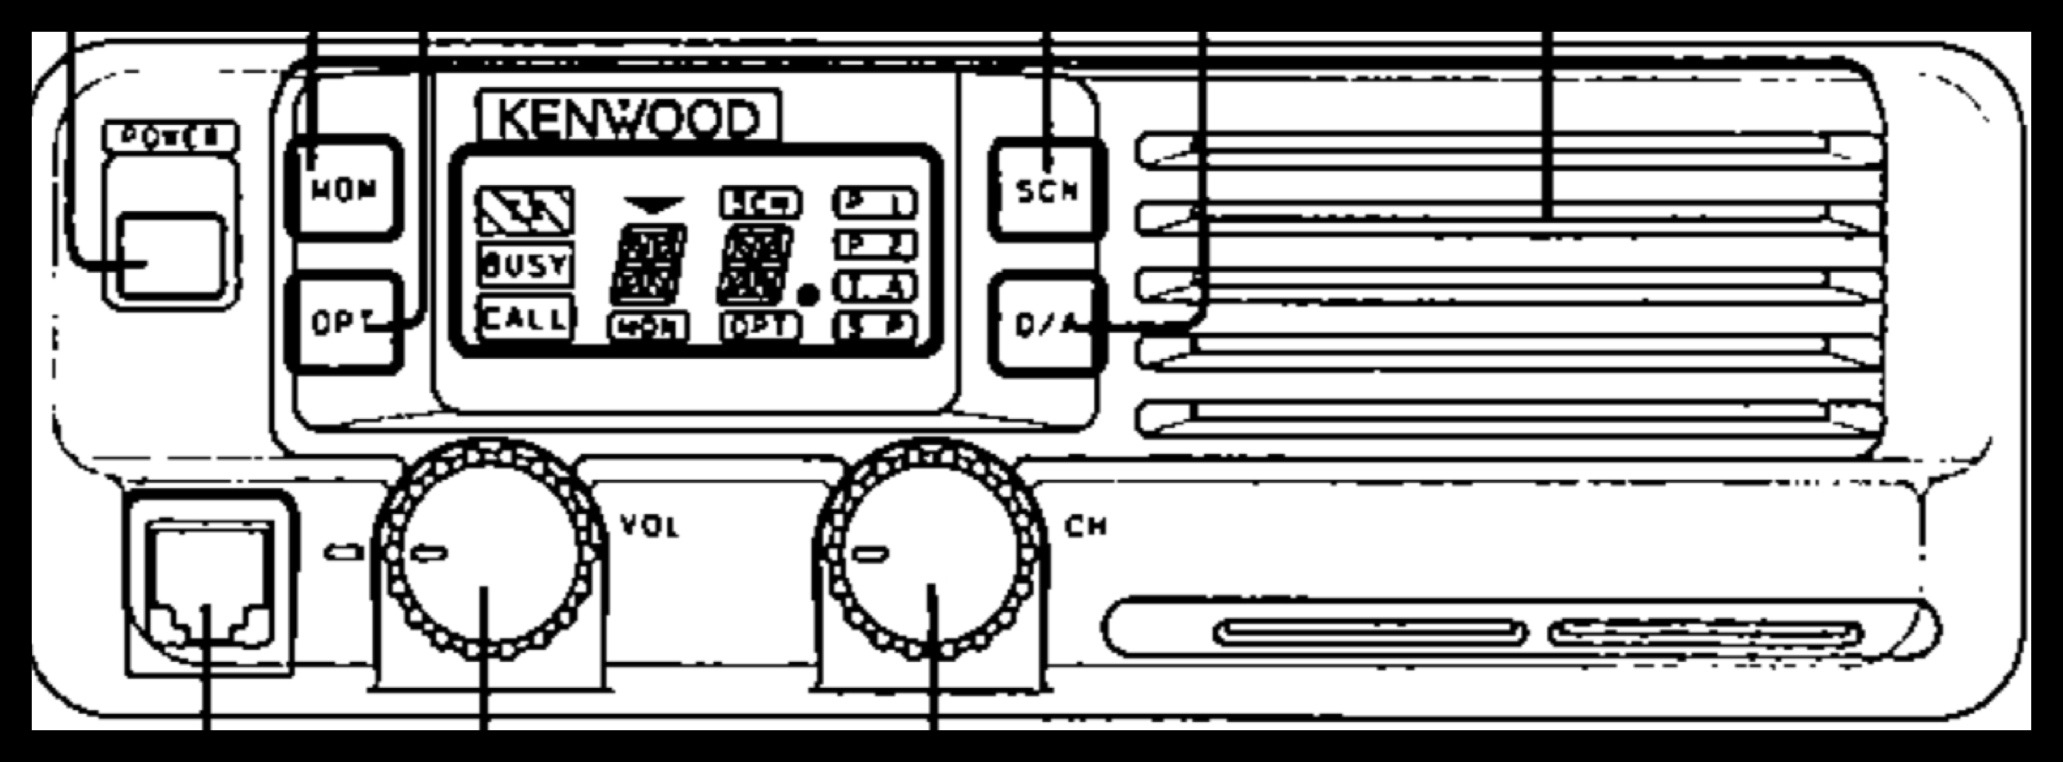
The four programmable buttons on the KCH-3 BASIC head are (and are labeled) as follows:
MON, OPT, SCN, D/A.
MON – Usually, one would set the MON button up as MONITOR in a FULL PL tone environment. The operator would press the monitor to hear if the frequency was clear before using the channel to make a call. On our Northeast Ohio template, we don’t use the radio with receive tone (CTCSS) technology. Since we use carrier squelch technology, we use this button to turn on a programmable squelch. Once depressed, the channel will display an “accent” next to a number on the channel display. This is the squelch level. To open the squelch, use the channel selector knob to dial counterclockwise to OPEN (decrease) the squelch, and clockwise to CLOSE (increase) the squelch.
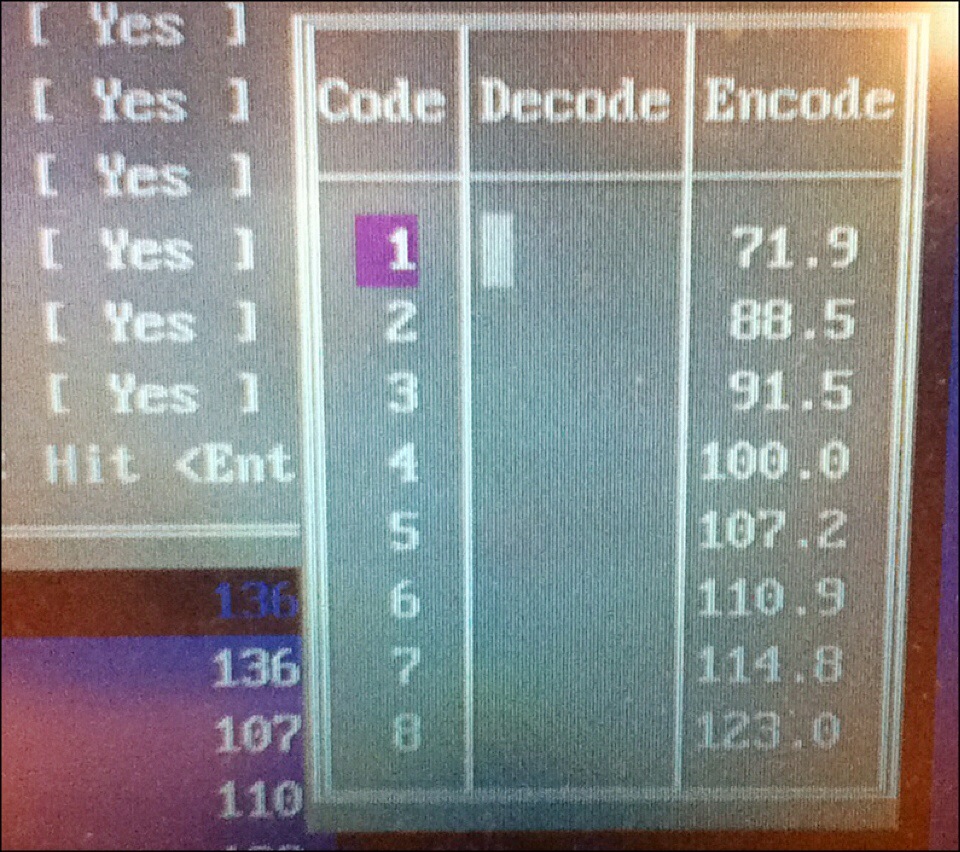
OPT – You will notice that on the channel template above, there is a predefined TONE ENCODE frequency included and programmed on each channel. In it’s native mode, as you select channels, the programmed PL tone is set as you change the channel. In our Northeast Ohio template, we have programmed the OPT key as a USER PROGRAMABLE ENCODE PL selection. By pressing the OPT key, the user selected PL ENCODE TONE is turned on. To set the TONE frequency, press and hold the SCN button while quickly pressing the OPT button. (SCN+OPT) This will display an “ACCENT” mark next to a number. Using the CH knob, select the pre-programmed frequency of your choice. The Northeast Ohio template is programmed as follows:
‘1 – 71.9 Hz
‘2 – 88.5 Hz
‘3 – 91.5 Hz
‘4 – 100.0 Hz
‘5 – 107.2 Hz
‘6 – 110.9 Hz
‘7 – 114.8 Hz
‘8 – 123.0 Hz
‘9 – 131.8 Hz
’10 – 136.5 Hz
’11 – 141.3 Hz
’12 – 162.2 Hz
For example: If you leave the Northeast Ohio area, you might find another repeater using the same standard repeater pair on CH#9 which is programmed for 53.050MHz. Our CH is preprogrammed with a PL tone of 136.5 Hz. The repeater you want to operate uses a PL tone of 110.9. You would hold down the SCN key while pressing the OPT key, and select ‘6 using the CH knob. (Pressing the OPT key again locks in the function and returns you to your channel display.) NOTE: The pre-programmed OPT PL stays on whatever selection you last selected it to, anytime you press the OPT key until you change it. It is not stored individually by channel.
SCN – The SCN key is programmed to SCAN the programmed frequencies for activity. Pressing the key will display SC in the display. As the radio scans the receive frequencies for activity, if it finds activity on the channel, it will stop on it and display it. You will hear the activity as well. It will resume scanning when the channel activity ends. If you wish to exit scan, press the SCN key again to return the radio to normal.
D/A – The D/A key is programmed to DELETE and ADD frequencies from the SCAN table. In normal mode, the channel display will have an upside down triangle above the channel number on the display. This means that this CH is included in the SCAN table when the radio is in the SCAN mode. (See above SCN feature.) To remove (LOCK OUT) a frequency, simply press and hold the SCN key while briefly pressing the D/A key. The upside down triangle will disappear from the display, and remove the channel from scanning. Repeat the process to INCLUDE the CH to the scan table.
Of course, all of these KEYS are USER PROGRAMABLE and can be changed if one wishes to use other options.